READERS

Monday, June 3, 2013

Espresso Banana Bread

Its official summer! thank goodness! I have been waiting for summer I feel like since summer ended last year. around here in Oklahoma there have been some destruction. for instance; tornados, thunder storms, hail, rain that seems like it will never stop. So it doesn't really "feel" like summer even though its already June and Fourth of July things are already out at Wal-Mart. Wal-Mart is always in a hurry aren't they, Like right when the Fourth of July passes, they put out school supplies! I want to scream when I see them because its just a reminder that my summer is half way over.


So on this dreary/summer Oklahoma day all I feel like doing is making banana bread and watching Army Wives on Netflix (possibly the most addicting show and the bad part, there are 6 seasons... I'm already on season 4 and its only been a week. SCARY)

This recipe I found while scanning through my saved recipes. I got it out of a magazine, not sure which one because I ripped it out, but either way its was very good. Something different for a change. I always make my banana bread recipe which is my ALL time favorite, but I decided to mix it up a little bit. Hope you like it!

Espresso Banana Bread
found in my pile of recipes
makes 1 loaf

  • 1 1/2 cups mashed bananas (about 4)
  • 1/4 cup sugar
  • 1/4 cup packed brown sugar
  • 1/2 cup unsalted butter, melted
  • 1/4 cup milk
  • 1 large egg
  • 1 1/2 cups all-purpose flour
  • 1 1/2 teaspoon instant espresso powder
  • 1 1/2 teaspoon baking soda
  • 1 teaspoon salt, (yes 1 teaspoon)
  • 1/2 cup semi-sweet chocolate chips, optional
  • 1/2 cup walnuts, roughly copped, optional
Preheat oven to 350*F. Butter and flour one loaf tin and set aside.

In a large bowl, mix together the bananas, sugars, butter, milk, and egg. In another bowl, combine the flour, espresso powder, baking soda and salt. Pour the wet ingredients into the dry ingredients and stir to combine. At this time you can add the chocolate chips an the walnuts. Of course this is optional but I added the chocolate, because why not...everything is better with chocolate.

Pour into prepared loaf pan and bake for about 55 minutes, or until the top is golden and a toothpick inserted in the middle comes out clean. Let cool in the pan for 15 minutes after taking out of the oven then invert into a wire rack to cool completely.

Tuesday, May 21, 2013

The best granola

Recently I got Gwyneth Paltrow's new cookbook, Its All Good. Lets just get one thing straight, I have a secret girl crush on Gwyneth. She seems so sweet and nice, and lets not forget absolutely gorgeous! So I got her new cookbook and its all about being healthy and living right. People need to realize that they only have one body and what you put into it effects your everyday life. I try to be health conscious as possible. I have read several books on food and benefits of certain types of food. I like the feeling of giving my body the best quality food I can find/cook. It makes be feel better about my self and actually makes my body happy. Ever since I have been more health conscious I have never felt better. I have more energy and my skin looks better. Everything about eating healthy is appealing to me. WARNING: There is no negative to eating healthy. Well I haven't ran into any negatives in the past couple years.
So back to the awesome cookbook. If you haven't read her book or anything about her, go online and read about her heath journey and how she lives. It is very interesting and it made me want to be even more health concerned. She lives her life with her body in mind and that is my goal for the rest of my life.
I haven't had much time to cook recently, I have been so busy with school ending and tests. Jut to let you know senior year of High school isn't as "relaxed" as people had told me. So everyone who told me I was going to have a stress free year, I want to throw a wet sock at your face, (Sorry for being so violent, but picture throwing a wet sock at your biggest enemy... its really funny, try it)
When I first got the cookbook, of course, I threw myself into it. I read it cover to cover at least three times by now. The first thing I wanted to make out of it was her famous granola. I don't know about you but I love granola. It's great on everything! Ice cream, with your favorite milk, yogurt, or just by its self for a quick snack. So just a quick warning that this recipes is really easy and the granola is very addicting. Since it's easy to make, you will be making this ALL the time. I made two big batches within on week because my family and I love it so much! And you don't have to worry about any weird ingredients or chemicals because you make it yourself! It's a win win!

The Best Granola
Adapted from It's All Good
(This recipe calls for Quinoa flakes but I used oats, so if you decide to use oats make sure they are old fashion, not the quick oats)
  • 1/2 cup extra virgin olive oil
  • 1/2 cup good-quality maple syrup
  • 1/2 tablespoon pure vanilla extract  
  • 3 cups quinoa flakes or oats
  • course sea salt
  • 1 1/4 cup walnuts
  • 1 1/4 cup raw pumpkin seeds
  • 3/4 cup roughly copped figs
  • 3/4 cup roughly copped pitted dates
Preheat the oven to 400*F
Whisk together olive oil and maple syrup in a large bowl. Add the oats or quinoa flakes, stirring to combine it all together. Evenly spread the mixture on a cookie sheet lined with parchment paper and sprinkle with sea salt. Make to keep your eye on the granola because it takes a while for it to get brown, but it doesn't take long for the granola to burn. I normally add the nuts to the mixture before I put it in the oven so the nuts are covered with the yummy coating. It doesn't really matter but that is what I prefer. Roast the granola or about 25 minutes. Stirring occasionally.
Let the granola cool completely when it comes out of the oven, then add the rest of the figs and daes. the add ins are totally optional, it is really good with the add ins, but just as good without them.
After you are done mixing the rest together, keep in an air tight container up to 3 weeks.
Hope you enjoy.  
SORRY FOR THE NO PICTURES! I SWORE I TOOK SOME BUT I GUESSED I DREAMT THAT!

Friday, November 2, 2012

Healthy Banana Muffins

At my house there has been A LOT of early mornings, the ACT, school, and of course deer season. Deer season around my house is a big deal. Not necessarily to me and my mom, but it is a valuable time for my dad and brother. They get up early and go out on the stand and just sit and sit for hours! I seriously don't know how they do it. My mom and I love deer season because we get two big benefits from the season: 1st, we get to enjoy the awesome deer meat they  bring home and 2nd, we get girl time! Its precious time that me and my mom NEVER take advantage of.
So when we have early mornings around here, it means breakfast is a hard choice. My dad and my brother like to stop by the nearest McDonald's and get themselves something, but I thought I would make their lives easier and keep them healthy as well. I found this recipe a while back and had wanted to make them for quite some time, but you have to have overly ripe bananas for the recipe. In my house we love bananas so they weren't getting soft before someone ate them! Finally I bought some bananas and told everyone in my family that they were not to be eaten or thrown away.
The muffins are healthy, easy , and really good! So whats not to like?!

Healthy Banana Muffins
yields about 12 muffins
80 calories EACH!
(I doubled the recipe because I wanted to freeze some!)

3/4 cup all purpose flour
1/4 cup whole wheat flour
1 Tbs baking powder
1/2 tsp baking soda
1/8 tsp salt
1 cup mashed banana (approx. 2 very ripe bananas)
1/4 cup sugar
1/4 cup plain applesauce
1 egg
1/2 tsp vanilla extract

Preheat oven to 350. Stir together the flours, baking powder, baking soda, and salt. Set aside. In a separate bowl beat bananas, sugar, egg, and vanilla. Stir in applesauce, stir in flour mixture. Pour batter into lined muffin tins. About 3/4 full. Bake for 15-20 minutes or until a toothpick comes out clean.

Tuesday, August 14, 2012

Dear Julia

So yesterday would have been Julia Child's 100th birthday, so I was feeling in the spirit to celebrate this special occasion.
I know ever since the blog and movie Julie and Julia people have been trying to cook their way through her cookbook and write about it, I would not be one of those people. I thought I could do it at one point, but after yesterday I know it could never ever happen. The reason why I could never ever do that is because all her food is sooooo good! I mean that's not a bad thing, but if you are like me and like to shove their faces with food and don't like to stop, I am warning you now. BACK AWAY FROM THE COOKBOOK. Okay now I can say I have warned you.
My mom and I thought it would be good to make a dessert because of course, why not?! I looked up her cookbook and the dessert that sounded AMAZING was the Reine de Saba avec Glaçage au Chocolat (chocolate almond cake with chocolate icing) Okay, so you are thinking to yourself chocolate cake with almonds, sounds SUPER exciting (sarcasm) BUT the thing is, it truly is amazing. I quote my dad on this "This is the best thing I have ever eaten" Well Dad you can thank Julia for this recipe.
Last night while I was eating this wonderful creation I was thinking if I were able to write a letter to Julia, what would it say? Would I thank her for this wonderful and addicting dessert, thank her for her great cooking ability or that she brought a great happiness to the kitchens all around the world? It gets the thinking...
AND I was watching the movie as I was shoving the cake in the mouth, I saw the part in the movie where Julie (the blogger) made the cake and it showed her and her husband shoving the cake in their mouths too. This make me feel a lot better because it's impossible to eat this cake without shoving it into your mouth. Don't be ashamed we allll do it.


Reine de Saba avec Glaçage au Chocolat
INGREDIENTS:
FOR THE CAKE
4 ounces or squares semisweet chocolate with 2 TBS rum or coffee
1 stick butter,softened
2/3 cup granulated sugar
3 egg yolks
3 egg whites
pinch of salt
1 TBS granulated sugar
2/3 cup pulverized almonds
1/4 tsp almond extract
1/2 cup cake flour, sifted

FOR THE ICING
2 ounces semisweet baking chocolate
2 TBS rum or coffee
5 to 6 TBS butter

INSTRUCTIONS:
FOR THE CAKE
Butter and flour a 8 inch cake pan and set aside. Preheat the oven to 350. Set the chocolate and rum or coffee in a small bowl over a pot of simmering water, let the chocolate melt while you start the ingredients. Cream the butter and sugar until pale yellow and fluffy. Beat in the egg yolks until well blended.
Beat the egg whites and salt in a separate bowl until soft peaks are formed, then add the sugar and beat until stiff peaks are formed.
With a rubber spatula, bland the melted chocolate into the butter, sugar and egg yolk mixture. Then stir in the almonds and almond extract. Immediately stir in one forth of the egg white mixture, fold it in DO NOT STIR VERY HARD! Blend nicely!!! Then add a little of the flour and fold that in as well. Repeat folding in the egg whites and the flour until it is all incorporated.
Turn the batter into the buttered and floured cake pan. Bake for 25 minutes or until a toothpick comes out clean on the edges and the middle is slightly under done. When it is done keep the cake in the pan for a good 10 minutes the take it out to cool.

FOR THE ICING
Place the chocolate and the rum or coffee into the bowl that is over a simmering pot of water and let the chocolate melt. When the chocolate has melted all the way and it is smooth, take the bowl out of the water and beat in the butter a TBS at a time. When you are beating in the butter place the bowl over ice so the chocolate cools off and thickens as you beat the icing. When the icing has the right consistency frost the cake. Make sure the cake has been cooled off for at least 2 hours before you ice the cake.


Enjoy and if you're like me, enjoy with coffee or a nice cup of milk.

Thursday, June 7, 2012

PASTA!

It has been to long since I have last blogged. I have been a little stressed lately and couldn't find the time to put up a post. The first day of summer I got into a wreck and I found out yesterday that my car that I LOVE was totalled. So today I had to go get all my stuff out of it and I cried. My mom and I pulled up to it and my car just looked so sad. I have been depressed all day and I also have been looking online for cars with my parents all day as well. You would think it would be fun, its not.


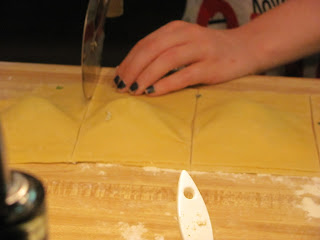
On to the PASTA! I have a passion to really learn how to make food. I want to travel and learn from native Italian, French, and Indian people. I want to go to the "roots" of where the food started and learn how to really make it. Of course that it my dream, so I had to stick to the books on this one. I looked in all my moms recipe books and I researched how to make homemade pasta. I wanted to perfect the method. My mom has a fantastic pasta maker that she lets me use and I love it! I decided to make ravioli and also make a tomato sauce. The dough for the ravioli is really easy but rolling it out is when you have to be patient. With making pasta I founds out that the first thing you need is patients.

Ravioli Dough
Serving size: 4

1 3/4 cup all purpose flour
1/4 teaspoon salt
3 large egg yolks
6 tablespoons (or more) water
5 teaspoons olive oil

Mix flour and salt in a medium bowl; make shallow well in center. Add egg yolks, 6 tablespoons water, and oil to well. Using fork, whisk water, egg yolks, and oil. Gradually work in flour from around egg mixture to form crumbly mixture. Knead in bowl until dough comes together, adding more water by 1/2 teaspoons if dry. Turn dough out onto lightly floured work surface and knead until smooth and elastic, about 5 minutes. Divide into 4 equal portions. Cover with plastic wrap; let rest on work surface for 30 minutes.
When the dough has rested take 1/4 of the dough and run it through the pasts machine on the biggest setting. Do that a couple of times and keep moving up the setting of the pasta machine so it get really thin. You want very tin dough. Once it is rolled out enough place about a tablespoon of your filling, use egg wash around the filling as a glue for the cover pasta and cover with another sheet of pasta. Cut the pasta (I used a pizza cutter, its just easy) and then press firmly with a floured fork so no water with get in. Set aside until the BIG pot of salted water is boiling. Homemade pasta cooks faster so once they have been floating on the top of the water for about 2 minutes, they are done! Serve with your favorite sauce! It sounds difficult, but give it a shot! You will want to keep making pasta, trust me!
My filling for the ravioli was ricotta cheese, mushrooms, and spinach. I found a recipe for homemade tomato sauce and I also added meat into sauce since the filling didn't have any. You can really put anything with this pasta. It has a great texture and when it is cooked, it has great flavor.

Sunday, April 8, 2012

For the Love of Bread

I don't know about you but I have a love for bread. The smell of bread baking in the oven makes my day. The joy of taking it out of the oven and slicing it and watching the steam come out of the hot, irresistibly yummy bread. I don't care if it is banana bread or fresh baguettes....I love bread. Sweet or savory.
So I thought I would share a savory bread recipe that I created a couple weekends ago when I had no homework and it was raining outside. When it is raining I either want to be at Barnes and Noble or I want to be cooking/baking something. Even though I could be cleaning my room or working out....I chose to bake some bread. Now looking back on it, I should have worked out, then should have  baked some yummy not so good for you bread. OH well. It has oats in it and dried friut...just say its healthy and don't think anymore about it.

Here are your ingredients:


2 1/2 cups all-purpose flour
1 tsp. baking powder
1 tsp. baking soda
1/2 tsp. salt
1/2 tsp. ground cinnamon
Dash of nutmeg
1 cup quick cooking oats
3/4 cup honey
1/3 cup vegetable oil
2 eggs
1/2 cup fat-free milk
2 cups fresh cranberries (or 1 cup dried)

Preheat oven to 350 degrees F and grease a 9x5 inch loaf pan. In a medium bowl, stir together flour, baking powder, baking soda, salt, cinnamon, nutmeg and oats.

In a large bowl, mix together honey, vegetable oil, eggs and milk. Mix in flour mixture until just moistened. Stir in cranberries and pour into prepared baking dish. Bake for about 40 minutes, or until a toothpick inserted in the center comes out clean. Enjoy!

Saturday, February 25, 2012

It's Easy Being Green

Lately in Oklahoma, the weather was been awesome. It was 72 degrees the other day and today it's a mild 62 and I'm loving it. This weather makes me wish the Farmer's market was open. Since the weather has been so nice, my family and I have been grilling things outside on the grill. Every time my dad grills something, it makes me think of SUMMER! I cannot wait! Even though this school year has been great and all, I'm ready for a nice long break!
I love the green color
OK so back to the food, lately I have discovered brussel sprouts. They are so cute and little, but they can be intimidating. If you don't cook them the right way, you will end up eating a very bitter little brussel sprout. I found a recipe that sounded great and I thought to myself, I have to start somewhere and improve from there. I ended up making them with grilled chicken. These little guys were AMAZING! They had just the right sweetness to them and I should have made more!

Roasted Brussel Sprouts
A Molly Woodward Creation

  • 1 1/2 -2 lbs. of brussel sprouts, trimmed and cleaned
  • sea salt and pepper, good amount
  • about 4-5 Tbs. of olive oil
Preheat your oven to 400.
Cut off the ends and yellow-ish leaves.
Make sure your brussel sprouts are trimmed and washed. Take a cookie sheet or a glass container and lay all the little brussel sprouts out on it. Drizzle with olive oil and season well with salt and pepper. Make sure all the brussel sprouts are coated with everything. Pop in the oven for about 30-40 minutes. Check on them and when they start to turn dark, pull them out and gobble them up.
They should look like this when they are done!


This recipe is SUPER easy and really yummy. The good thing about this recipe is that you can serve it in a salad, pasta, or just as a side dish. It is excellent and worth the try. Don't be scared, they are Delicious!